Saturday 27 June 2009

Assignment 1: The Theory and Practise of Contrasts

The first Assignment of Photography 1: TAoP is The Theory and Practise of Contrasts. The aim of this assignment to identify subjects that best express the extremes of different quantities and to take pairs of photographs which bring out the essential differences. Eight contrasts should be portrayed in four pairs of photographs and a ninth should be shown in a single image.

I have finally finished taking the photographs for my first Assignment. I assumed that I wouldn't encounter any problems, however there were a few. When photographing water and ice it was extremely difficult to obtain images that I felt were suitable for their purpose. Thinking of subjects to portray each contrast isn't difficult, although it is hard to position them in the most suitable conditions and composition that best capture what they intend to depict.


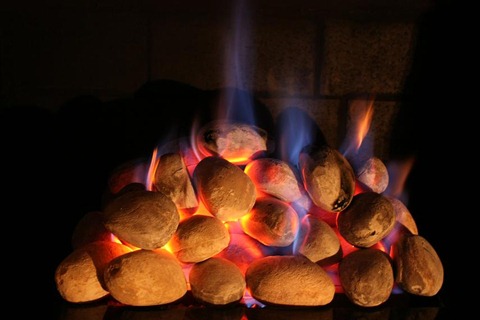
HotISO-400, 25mm, 1/3sec, f/4.5

Cold
ISO-200, 55mm, 1/125sec, f/14

Hot: Gas Fire - I began experimenting by lighting matches but I couldn't quite get the result I wanted. After spending a while with the matches I decided I needed a bigger fire so ventured into the living room and took around fifty exposures of the gas fire. It was difficult to capture a photo that actually looked hot due to the blue flame created by the gas. After having it lit for a while the rocks began to glow red and created a much better effect. When taking this photograph the only light source was a small lamp I placed on the right hand side of the fire (and the fire itself of course). The orange glow and red tones of the image, along with our knowledge that fire is hot, creates a photograph that portrays heat.

Cold: Pile of Ice - As it is not easy to obtain anything colder than ice, I decided that there was no better subject for me to use. Photographing ice is very difficult, it slides all over the place, can have transparent and opaque sections and reflects light in all different directions. To capture the image above I emptied the ice trays from the freezer onto a sheet of glass above a black sheet in the garden due to the natural light of the sun.

Life
ISO-200, 50mm, 1/250sec, f/1.8

Death
ISO-200, 34mm, 1/3sec, f/7.1

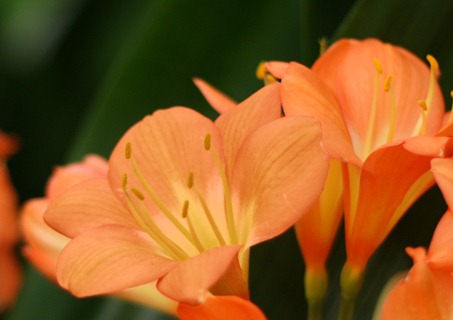
Life: Plant with Flowers - I didn't take this photograph specifically for the assignment, in fact I took it a few moths ago on a trip to Tatton Park. It was the first "nice" day of the year, the sun was out and was quite warm. I saw this plant and thought I could use its image on a greetings card. Whilst trying to find a suitable subject to portray "life" I came across this image on my computer and decided I could use it.

Death: Dead Leaves, Branch, Twigs and Flower - Being a very sombre subject I wanted to capture it's image in the most light-hearted way possible so I chose foliage. I placed a layer of leaves onto a table and put twigs, a section of rotten branch and a dead flower on top as the main focal point. To light the scene I placed two lamps either side and aimed them directly at the dead flower.

Liquid
ISO-200, 55mm, 1/200sec, f/5.6

Solid
ISO-400, 30mm, 1/60sec, f/7.1

Liquid: Water - I have always been very interested in water, an extremely difficult subject to photograph. As my camera has an x-sync of 1/200s. This means that I am unable to use the camera's in-built flash with a shutter speed faster than 1/200th of a second. This may be a very fast speed, but when trying to capture moving water, it is in fact quite slow. I needed to use the built in flash because I couldn't get enough light without it, even with ISO set to 800. To capture the image I placed a black plastic tray in the sink and turned on the tap. To light the scene, I had the tungsten lights on in the kitchen and used the in-built flash on the camera.

Solid: Ice - As ice is the solid form of water I decided that it would be perfect to portray solid. Already having used this subject for cold I wanted to capture it in a different way. I placed a mirror flat on a table, attached a sheet at one end and held it diagonally over the mirror so that its blue colour would reflect and create an interesting background. I then placed 5 pieces of ice upon the mirror and took a few shots. Light conditions: taken inside with the in-built flash and the natural light passing through the windows from the dull cloudy weather outside.

Many
ISO-400, 55mm, 1/8sec, f/9

Few
ISO-400, 55mm, 1/10sec, f/9

Many: Chessboard fully setup - Having always been interested in Chess, I instantly thought of this when trying to decide what would best depict many and few. I setup the chessboard in front of a black background on a window sill and lit the scene with a lamp on the left and the light coming through the window.

Few: Several Chess Pieces - Lit in the same way, the conditions were identical, I simply removed most of the pieces and placed the remaining ones in new positions.

New/Shiny
ISO-400, 49mm, 1.3sec, f/20

Old/Dull
ISO-400, 49mm, 1.6sec, f/20

New/Shiny: Modern Sterling -
Here I have manged to portray two opposites instead of just one. Originally I was going for new and old but then realised it also shows shiny and dull. I put together a collection of the newest, shiniest coins I could find and placed the 2008 Royal Shield of Arms coins on the top as they are the most recent to be circulated. To light the scene I placed a lamp on either side of the coins.

Old/Dull: Mixture of late 1800s+early 1900s sterling - My parents have a collection of old coins so having borrowed these I piled them up the same as I did with the new coins. This time however I placed the oldest coins on top to give the photo the oldest look possible. It's obvious they're very old, with some containing the image of Queen Victoria, King George V and King George VI. The lighting conditions are identical to that of the "new" photograph.

Green
ISO-200, 24mm, 1/125sec, f/7.1

Red
ISO-200, 29mm, 1/80sec, f/5

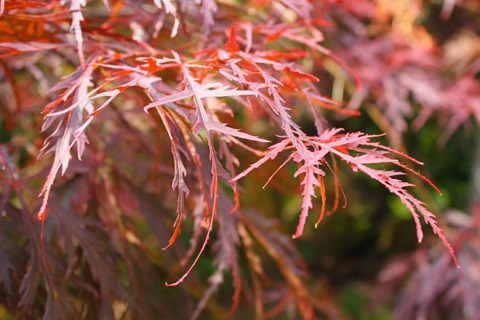
Green: Green Japanese Acer - I find Japanese Acers particularly attractive and seeing as though we have both green and red varieties in our garden I decided to use red and green as one of my contrasts. To light this photograph I used the bright light of the sun.

Red: Red Japanese Acer - The exact same conditions apply for the red image as for the green.

Rough
ISO-400, 18mm, 1/60sec, f/5.6

Smooth
ISO-200, 33mm, 1/30sec, f/4.5

Rough: Dry Stone Wall - I originally captured this image a few months ago on a drive out along the Snake Pass. I did not intend on using it for the assignment but whilst searching for an opposite to smooth I came across this photograph on my computer. The light was dull and the flash did not fire.

Smooth: Moist Pebbles - I poured a bucket load of small pebbles onto a table and placed some larger ones on top as the main points of focus. To light the scene, the dull light from the cloudy weather outside shone onto the subjects and I also used the in-built flash.

Looking back on Rough and Smooth, they could also be used to depict Dry and Wet however I feel I have chosen better subjects to display this contrast.

Wet
ISO-200, 55mm, 1/160sec, f/6.3

Dry
ISO-800, 36mm, 1/15sec, f/8

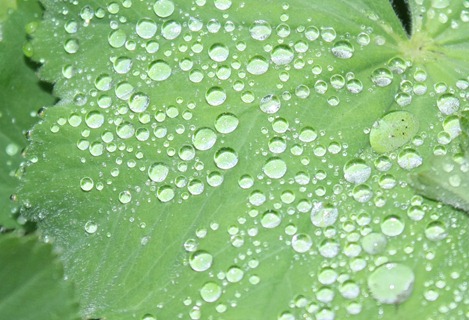
Wet: Droplets on a leaf - I have seen this type of photograph before and have always thought that the droplets were created with a dropper, when I found this plant with the drops naturally on it after a brief downpour I just had to shoot it. The plant was in front of my house; to light the scene I used the camera's in-built flash due to the weather being quite dull. I originally took this photograph because the subject stood out to me, I later decided on using Wet and Dry for one of my contrasts due to this picture.

Dry: Collection of dry ornamental objects - I struggled and struggled to think of a subject that would portray "Dry" the best. I experimented with many subjects, even creating a sandy, desert like, scene with my pet Leopard Gecko for added authenticity. I could not find anything except this ornamental collection that truly looks "Dry". To light the subject, the sun was shining through the windows and I used the in-built flash.

Black and White/Male and Female
ISO-200, 55mm, 1/10sec, f/14

Back and White/Male and Female: Black King and White Queen - After reviewing the photographs I took earlier to depict Many and Few, I decided to re-use the chess pieces to create my final contrast. As the pieces are inherently black and white I wanted to exaggerate this characteristic by capturing them in monochrome and placing each piece on a square of the opposing shade. I also used the Queen and King so I could also portray Male and Female within the same image. The chessboard was setup in front of a black background on a window sill and lit with the light coming through the window and the in-built flash on my DSLR.

I have taken approximately a thousand photographs whilst searching for the perfect images to portray my chosen contrasts and after completing the assignment I feel I have managed to capture some interesting results that express their contrasts nicely.


Tutor Feedback

I have received some feedback from my tutor regarding the first assignment. Having read through his report I'm very pleased with what he had to say. Peter's comments have reinforced the feelings I had about how well I completed the assignment and have made me more confident that I will complete the next assignment without any problems.


page 1_________________page 2


To view my tutor's comments simply click the images to display larger versions.


Amendments

Upon receiving feedback from my tutor I took note of his advice and have edited some of my photos accordingly.

Below is a list of the affected images and the advice my tutor gave for each:

  • Cold – Re-take with a lighter background to add to cold effect and increase contrast
  • Life – Re-take using a tighter aperture to improve sharpness and go in closer to isolate subject
  • Liquid – Re-take using a slower shutter speed and not using flash
  • Many – Use a slightly higher viewpoint and remove the pawn that’s hidden behind the knight on the left hand side
  • Green – Go in closer to one of the leaves to make it stand out from the background
  • Rough – Try the shot again on a better day to improve the sky
  • Wet - Go in closer and don’t use flash for a more delicate effect

During the completion of my amendments I will re-post all of the affected pairs because they work together to portray their contrasting qualities.

Hot ISO-400, 25mm, 1/3sec, f/4.5hot copy  Same as original
Cold Amended ISO-400, 30mm, 1/60sec, f/7.1cold new  I originally used this shot to portray Solid. After lightening the background slightly I decided to use it for Cold as it depicts this condition much better.

Life Amended ISO-200, 50mm, 1/250sec, f/1.8life new To improve Life’s composition I cropped and slightly sharpened it in Photoshop
Death ISO-200, 34mm, 1/3sec, f/7.1dead copySame as original

Liquid Amended ISO-1600, 105mm, 1/50sec, f/14LIQUID NEW Upon recommendation from my Tutor, I had another try at my Liquid shot. I reduced the shutter speed to give the water a much more fluid feel. I used a tighter aperture to increase the depth of field and used a high ISO in order to adequately expose the shot. I feel this shot does look a lot more “Liquidy” as we can tell that it’s moving do to some slight motion blur.

Solid Amended ISO-200, 55mm, 1/125sec, f/14solid newI originally used this shot the portray Cold but I swapped it to depict Solid as the dark tones nicely match that of my Liquid shot and they work better as a pair. Another reason was that my original solid shot appeared more Cold therefore I’m now using it to portray Cold.

Many Amended ISO-400, 88mm, 1/13sec, f/5.6 MANY NEWI have retaken this shot and removed the pawn that was hidden behind the Knight on the left hand side. I admit that this does improve the shot and it’s barely noticeable that a piece is actually missing.

Few ISO-400, 55mm, 1/10sec, f/9few copyThis is the same shot as before

Green Amended ISO-200, 105mm, 1/125sec, f/6.3GREEN new Upon reviewing my shot of “Green” I agreed with my Tutor that I should have another go. Unfortunately, the green Japanese Acer that I sot last time has died and I was unable to find another so I chose a different Green plant. I had to crop a lot of other leaves from this shot but I feel I’ve created a reasonable composition that is most definitely Green.

Red ISO-200, 29mm, 1/80sec, f/5red copyThis is the same shot as before

Rough Amended ISO-200, 18mm, 1/60sec, f/5.6rough new To improve this shot I converted it to Black and White and replaced the sky in Photoshop. I also boosted the contrast. The increased contrast and Black and White greatly increase the overall rough appearance and therefore does a much better job at portraying Rough.

Smooth ISO-200, 33mm, 1/30sec, f/4.5smooth copyThis is the same shot as before

Wet Amended ISO-200, 55mm, 1/160sec, f/6.3wet new To improve this shot, I simply cropped the original to create a more aesthetic composition.
Dry ISO-800, 36mm, 1/15sec, f/8 (Portrait)dry copyThis is the same shot as before

Amendment Summary

During the completion of my amendments I re-posted all of the affected pairs because they work together to portray their contrasting qualities.

Below is a list of the affected images and the improvements I made to each one:

  • Cold – I swapped this shot with the image that I originally used for Solid as it has a lighter background. I also lightened the background even further
  • Life – I cropped my original shot and sharpened it in Photoshop
  • Liquid – I had another try at this shot. I used a slower shutter speed to give the water a more fluid feel and a tighter aperture to increase the depth of field
  • Solid – My tutor didn’t advise that I alter this shot, however I swapped it with Cold because the colours and tones work better with Liquid
  • Many – I used a slightly higher viewpoint and removed the pawn that was hidden behind the knight on the LH side
  • Green – Unfortunately the original plant had died when I went to re-take the shot so I chose another plant and took a close-up shot of some of the leaves
  • Rough – Instead of retrying on another day I simply replaced the sky using Photoshop, converted it to black and white and increased the contrast. All of this helped to greatly increase the feeling of Rough
  • Wet – I wasn’t able to re-create the original conditions so I cropped the original image to create a more aesthetic composition

Overall I feel I have followed my tutor’s advice quite well and have managed to improve the shots that needed amending.

Friday 19 June 2009

Splashing Around

I have spent pretty much all day trying to take photographs of water. Rain, drops of water, running water, splashing water, rippling water, bubbling, boiling, throthing, spilling, anything and everything water to try and capture a shot that would best depict "liquid". I am using liquid and solid as one of my contrasts for the first assignment. After taking near to a thousand photographs I now need to decide which one is suitable. Water is a very difficult subject to capture. It reflects everything and can damage electrical equiptment. My DSLR has an x-sync of 1/200s. This means that I am unable to use the camera's in-built flash with a shutter speed faster than 1/200th of a second. This may be a very fast speed, but when trying to capture moving water, it is in fact quite slow. I have ended up with some very interesting results such as the one below but am un-decided whether to use this image with my assignment, I shall decide when I have my photograph for "solid".

Liquid Example
Focal Length 55mm, Shutter Speed 1/200sec, Aperture f/5.6, ISO 200

Wednesday 17 June 2009

Thoughts, Feelings and Planning my first Assignment

The aim of "2: The Frame" was to help me to use the viewfinder as an extension of my eye and ultimately help me to compose well designed and well balanced pictures.

I believe this set of projects has certainly helped me to understand what makes a photograph look "good" and I am now starting to plan my shots and take more time to ensure I capture a perfect image instead of a snapshot. Having said this, I look through the viewfinder much more and am beginning to see potential shots more often. Ultimately I'm taking less photographs but taking more that I feel are "better" than usual, more comfortable to look at, well balanced and interesting.

At the moment I'm slightly behind as it is the 17th of June and my first assignment is due on the 19th. I have informed my Tutor and he assures me it isn't a problem. I want to take my time to ensure I do the best I can and will get it to him soon.

I'm not too worried about this assignment, I don't feel I'll encounter any problems as so far I haven't experienced too many. The assignment is all about contrasts/opposites, this is one subject I feel I'm quite strong in and have come up with some interesting ideas. These include the use of long exposure at night and during the day to portray light and dark and using different components of musical instruments to depict loud and quiet.

Monday 15 June 2009

Cropping Continued

Below are a few photographs I have taken and then cropped to show that what is seen through the viewfinder does not have to be the set format of an image.

Image 1: I took this photograph along the Trans Pennine Trail, between Sale and Altrincham.

Original

18mm, 1/125sec, f/22

I did not intentionally take this photograph with cropping in mind. I came across the scene whilst out cycling and found it quite appealing so I hopped off my bike, got out my camera and got as close as possible. I wanted to keep the entire tree in the shot with the reed-mace in the foreground, I had a problem though, the reed-mace was taller than myself. I had to stand a few metres away where there happened to be a slight mound, and I had to hold my camera above my head, therefore not enabling me to look through the viewfinder. It took me a number of tries before I captured this image, the previous were either blurred or slanted.

Crop 1
With my first crop I tried to re-create the initial shot I had planned for the scene. Using the Golden Section, I placed the tree approximately in the right hand middle section with the tips of the reed-mace slightly above the lower line. The hill on the left balances the photograph with the tree on the right.

Crop 2

With this crop I designed the composition base don the Rule of Thirds. I placed the top of the tree trunk along the top horizontal line. The tree trunk itself is slightly on the left hand side of the left vertical line. This combination places the centre of the tree approximately upon the point where the top line and left hand vertical line cross; this creates a very pleasing composition.

Crop 3

This crop is the exact opposite of the second. Instead of placing the tree in the top left of the image, I have placed it bottom right. The trunk runs along the right hand vertical line of the rule of thirds and the top of the trunk sits upon the lower horizontal line, placing the centre of the tree where these two lines cross. The hill on the left rising up to the lower horizontal line also helps to balance this crop.

Crop 4
The final crop uses a Golden Triangle up the centre of the photograph. Placing subjects within this triangle create a very pleasing composition.

Image 2: I took this photograph of a bird bathing through a window.

Original
300mm, 1/13sec, f/5.6

I spotted a Blackbird bathing in the waterfall of our pond so grabbed my camera and took this shot through the window. Although the original photograph is rather comfortable to look at, I would like to use it to experiment with cropping.

Crop 1
For my first crop, I decided with the bird looking to the right I should place it on the left side of the picture. The bird's foot is placed where the left hand vertical line of the rule of thirds dissects; its head lies slightly to the left of this line and slightly above the top horizontal line. With the bird standing on a stone that's in sharp focus places a lot of weight in the bottom left golden section. This contrasts with the larger, blurred, out of focus stone on the right and helps to balance the image. I feel I have created a satisfying crop, however, I don't like the basket in the background, I will try some different crops.

Crop 2
The composition of this crop closely follows a harmonic triangle that begins in the centre on the left and opens to the corners on the right. The edge of the water follows the lower diagonal line although slightly above. The top of the birds head touches the upper diagonal line and the flower on the left is right in the point of the triangle and sits parallel with the lower line. The majority of the bird and the stone it's stood on are in the right hand third of the crop. The right vertical line and another diagonal line from a harmonious triangle crosses straight through the birds eye. The pebbles and rock to the left behind the bird are placed in the middle third of the image and the objects in the left third are out of focus which give the image a very strong composition. There is also a golden spiral in this crop. The spiral begins at the birds feet, curves up and round following the curvature of the birds back and finishing in the centre of the flower on the left, partly traveling down it's stem. All of these aspects together make this crop very pleasing to the eye and comfortable to look at.

Crop 3
This is one of my favourite crops. It's very simple yet still comfortable to look at. It contains a harmonious triangle. The point is in the centre at the top and the two sides end in the bottom left and right hand corners. This triangle is more to do with the weight of the objects with in the crop than their shape. The weight of the rock provides a large base for the lower part of the triangle and the weight of the bird, getting lighter towards its head gives a feeling of a triangle coming to a point at the top of the image where the main subject ends.

Crop 4

Within this image there is a harmonious triangle starting in the centre on the left and ending in the corners on the right. The edge of the water followers the lower line and the edge of the rock in the top right corner follows the top line. The lower line also runs across the top of the flower that protrudes furthest into the picture. The main subject's weight is in the two bottom right sections; the weight of the plant stretching the left side third of the image balances with the bird stood on the rock. There is also a golden spiral in this crop. It starts at the birds feet, curves round the bottom right corner where the base of the rock lies, passes underneath the lowest flower on the left and curves up to the right following the edges of the two blurred rocks in the centre and on the right of the crop. These aspects provide a very pleasing image.

Image 3: Taken along part of the Snake Pass which connects Glossop with Sheffield.

Original
39mm, 1/80sec, f/8

Back in March when I first acquired my DSLR I took it on a drive towards Sheffield. Almost half of the route from Manchester took me across the very dangerous yet picturesque Snake Road nicknamed Snake Pass. There are laybys safe enough to pull into when it's quiet so I stopped in a few a took some shots. I took the photograph above as I found the scene extremely appealing and wanted to capture the image as a reminder of the first trip with my camera.

Crop 1
To create a comfortable composition, I cropped my photograph so that the stream is in the bottom right golden section and the trees at the top are in the top left golden section. The tips of the trees follow the top line of a harmonious triangle that starts in the corners on the left and ends in the centre on the right. The angle of the hill on the right followers the lower line.

Crop 2
For this crop I wanted to create an opposite of the first. I placed the stream in the bottom left golden section and the tree line on the right followers the top line of a harmonious diagonal that begins in the top right corner and ends in the centre on the left.

Crop 3
With this crop I wanted to create a landscape image from the original portrait photograph. I placed the stream in the lower centre section of the rule of thirds. The tree lines on either side of the valley follow the harmonious diagonals, top left to bottom right and top right to bottom left.

Crop 4
My first three crops have been very similar so I decided to take a section from further into the photograph. The only problem is if I were to have this crop enlarged it would be very poor quality. The majority of the stream is inside the lower middle golden section. The left bank follows two harmonious divisions; the lower part follows a diagonal from centre right to bottom left and the higher part follows a diagonal from centre left to bottom right. These aspects create a well balanced comfortable image to look at.

After experimenting with cropping, I now have a much better understanding of how to use it to improve the composition of my photographs. Admittedly, not all of my crops are better than the originals but I have managed to create some pleasing and interesting results.

Saturday 13 June 2009

Testing a Standard SLR

I recently purchased the Canon EOS 500n. This is a film SLR that's compatible with lenses I already own. I came across the camera on ebay where I won it for £30, not too bad I thought. I decided I'd like to experiment with film photography instead of sticking purely with digital. I'll still be using my DSLR to complete TAoP course but I shall refer to experiments and photographs I've taken with the film SLR as I progress. The main reason I purchased the SLR was due to it capturing images at 35mm "full frame". The EOS 450D (DSLR) has an APS-C sensor which only captures images at 22.2 × 14.8mm, this is 1.6× smaller than a 35mm frame and means that photographs are cropped. When a photograph is taken at a focal length of 18mm on the 450D this is equivalent to a focal length of 28.8mm on the 500n (35mm film SLR).

As I am particularly interested in wide-angle photography I wanted a way of capturing the widest images possible without spending a ridiculous amount on a "super" wide-angle lens with a focal length of 10mm.. even then only capturing at 16mm.

So far I've only taken a few pictures with my SLR but as soon as I've finished the roll, I'll share some of the images. I've found I take a lot more care when using it, I don't take quick "snapshots" anymore, I take my time, plan my shot, wait for the perfect moment as batteries, film and developing are expensive. I'm hoping that this will teach me to do the same when using my DSLR as I have 1000s of photographs I don't feel are any good or are pretty much identical to each other yet I can't bring myself to delete them.


Canon EOS 500n________________Canon EOS 450D