To see exactly what I sent to my tutor please visit my set on flickr at http://www.flickr.com/photos/mikemoore88/sets/Assignment5
For this assignment, I decided I wanted to create a storyboard of my girlfriend making some muffins. I feel the different stages clearly illustrate the passage of time and progression towards a final result.
Chocolate-Chip Muffins
Ingredients: (for 12 Muffins)
- 1 3/4 cups of Self Raising Flour (220g)
- 2 tablespoons of cocoa powder (Lindsay used Nesquik milkshake powder)
- 3/4 cup of Muscovado Sugar (165g)
- 3/4 small packet of White Chocolate Chips
- 1 cup of Milk (250ml)
- 1/3 cup of melted Butter (76g)
- 1 egg
Directions
Preheat oven to 400 degrees F (205 degrees C).
Put all of the dry ingredients into a mixing bowl. Put all of the liquid ingredients into a measuring jug. Pour the liquid into the dry ingredients and mix together. Lumpy batter makes the best muffins so don’t beat too hard. Place 12 muffin cases onto a baking tray and spoon the mixture into them. Bake the muffins for approximately 20 minutes or until they are dark, risen and springy.
Once the muffins are ready, remove from oven and leave to cool before eating.
(Pouring melted chocolate and sprinkling the remaining chocolate chips on to each muffin is a nice touch and adds to the flavour.)
Lighting: a mixture of the kitchen’s Tungsten lights on the ceiling, fluorescent lights under the cupboards and my flash unit aimed at the ceiling. Lindsay baked the muffins in the evening and therefore there wasn’t any light entering the room through the windows. I aimed my flash unit at the ceiling as it provided the most attractive lighting. The ceiling acted as a reflector and a diffuser. When the light was reflected back at my scene it became very scattered, meaning that shadows weren’t too harsh gave a nice modelling effect.
The Event: Baking Chocolate - Chip Muffins
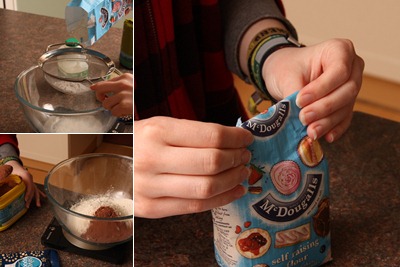
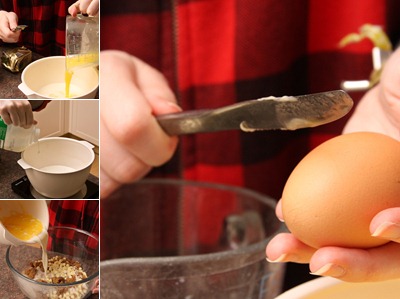
Preparation: Get all of the equipment and ingredients ready for use and set the temperature of the oven.

Open the ingredients, weigh the flour and add the cocoa powder to the mixing bowl.
Add the white chocolate-chips and sugar to the mixing bowl and weigh the butter.

Crack the egg, melt the butter, add them to the milk and mix into the dry ingredients.
Stir the mixture 
Spoon it into the muffin cases.

Place the muffins in to the preheated oven and wait approximately 20 minutes.

When ready, remove the muffins from the oven and leave to cool.
And finally it’s time to sample the finished article!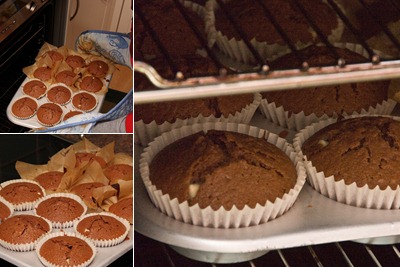

Summing it up: Myself and Lindsay truly enjoyed completing this project!! I feel I’ve managed to capture some great shots that illustrate the recipe and instructions adequately. Also, Lindsay’s muffins were absolutely delicious!!
To see exactly what I sent to my tutor please visit my set on flickr at http://www.flickr.com/photos/mikemoore88/sets/Assignment5
Tutor Feedback
Overall Comments
Hello Michael,
Many thanks for sending in your fifth and final assignment which as usual you have handled very well. The print quality is good and the subject matter you have chosen would make a very good article for a womans magazine or cookery book, as you comment on in your notes. Please find below my comments in more detail:
Feedback on assignment
Cover Image
According to your notes you bounced the flash off the ceiling to light the subject. That’s fine, but be careful when using this technique. If the ceiling is colored the light bouncing back may cause a color cast of whatever the color is. Just something to be aware of. The image itself does act as a good cover shot, but could do with a bit more contrast as the example on page 5.
Page 1 Preparation
The first image is biting sharp and the wording on the ingredients can be seen clearly. To improve this image get rid of the cacti in the background using the clone tool as it is a bit distracting.
The second image is fine. It clearly shows what the hand is doing and the skin tones are excellent.
It looks like you have used flash for your third image and this has resulted in the “hot spot” on the stainless steel cooker. Also the temperature reading has turned out a dull red because of the flash. The answer is to shoot this one again with the camera on a tripod and don’t use flash. This way you should have a brighter red on the reading.
Page 2 Opening the Ingredients
These three images are fine although the first one could do with being a fraction lighter on the flour bag.
Page 3 Adding the Ingredients
On image 1 you have added a bit more interest in the picture by doing an action shot and the chocolate chips can be seen very clearly dropping into the bowl. Had you used a slower shutter speed (1/15sec) this would have given more movement to the scene, but a good shot nevertheless.
On image two Lindsay is about to pour sugar into the bowl which can only just be seen in the bottom right hand corner and a viewpoint from slightly farther back or zoom out would be better to include more of the bowl.
Images three and four are both fine, but I would have put the unopened pack of butter before the jug shot.
Page 4 Liquid Ingredients
All these images are fine except the third shot which from what you say in your notes you are aware of. The answer to this would have been to pour the milk from a slightly higher position and against a darker background, just as you have done in image 4.
Page 5 Mixing
Again these are competent shots that illustrate the subject well, but clone out the mobile phone in the fourth image.
Page 6 The Oven
Direct flash would improve the lighting on the first two shots so that the background was lit up. The third shot is excellent and you should have used this technique for the first shot. The muffins can be seen very clearly because of the better lighting and look very mouth watering.
Page 7 Sampling
All the images on this page are very good. The texture of the muffin is evident on the last shot in which Lindsay is holding in her right hand. Well done and a very interesting assignment.
Other
Thank you again for allowing me to view your work. As always I hope you found the comments helpful as they are intended to be. May I take this opportunity to wish you well for your assessment, but if can be of any further help now or in the future please do not hesitate to get in touch.
Kind regards
Peter
Amendments
Upon receiving feedback from my tutor I took note of his advice and have edited some of my photos accordingly.
Below is a list of the affected images and the advice my tutor gave for each:
- Cover Image – Increase contrast
- Page 1 Top – Clone out cacti
- Page 1 Bottom Right – Re-take without flash
- Page 2 Top Left – Lighten bag of flour
- Page 3 – Re-arrange photographs
- Page 4 Top Right – Re-take using a dark background
- Page 5 Bottom Left – Slightly increase contrast
- Page 5 Bottom Right – Clone out the mobile phone
During the completion of my amendments I will re-post all of the images from the assignment because they work together as part of a narrative picture essay.
Cover Image Amended ISO-100, 144mm, 1/180sec, f/9.5
Page 1 Amended
To begin with, I added a title to this page.
Top Amended ISO-100, 28mm, 1/180sec, f/8
To improve this shot I cloned out some Cactus that was in the background.
Bottom Left ISO-100, 88mm, 1/180sec, f/9.5
Same as original.
Bottom Right Amended ISO-200, 34mm, 1/2sec, f/5.6
To improve this shot I placed my camera on a tripod and didn’t use the flash. I also cut a hole in a piece of card so that I could place it over my lens. The card stopped there from being any reflections on the oven. The technique works and the temperature can be clearly seen.
Page 2 Amended
Top Left Amended ISO-100, 72mm, 1/125sec, f/8
To improve this shot I cloned out some Cactus that was in the background.
Top Right ISO-100, 28mm, 1/125sec, f/8
Same as original.
Bottom ISO-100, 33mm, 1/125sec, f/8
Same as original.
Page 3 Amended
I re-arranged this page but didn’t do anything to the photographs.
Top Left ISO-100, 28mm, 1/90sec, f/8
Same as original.
Top Right ISO-100, 33mm, 1/90sec, f/8
Same as original.
Bottom Left ISO-100, 140mm, 1/180sec, f/8
Same as original.
Bottom Right ISO-100, 88mm, 1/90sec, f/8
Same as original.
Page 4 Amended
Top Left ISO-100, 72mm, 1/90sec, f/8
Same as original.
Top Middle ISO-100, 33mm, 1/90sec, f/8
Same as original.
Top Right Amended ISO-200, 59mm, 1/160sec, f/9
I re-took this shot using a black sheet of card for the background. The original had a white background and the droplet of milk was barely visible.
Bottom ISO-100, 48mm, 1/180sec, f/8
Same as original.
Page 5 Amended
Top Left ISO-100, 28mm, 0.7sec, f/11
Same as original.
Top Right ISO-100, 40mm, 1/180sec, f/8
Same as original.
Bottom Left Amended ISO-100, 144mm, 1/180sec, f/9.5
This shot is the same as the original however I have slightly increased the contrast.
Bottom Right Amended ISO-100, 18mm, 1/180sec, f/8
This shot is the same as the original however I have removed the mobile phone that was on the table between Lindsay and the jug. I used the Clone tool in Photoshop CS4 to remove the phone.
Page 6 Same as original
Top ISO-100, 88mm, 1/180sec, f/9.5
Same as original.
Bottom Left ISO-100, 200mm, 1/180sec, f/9.5
Same as original.
Bottom Right ISO-100, 40mm, 1/180sec, f/9.5
Same as original.
Page 7 Same as original
Top Left ISO-100, 48mm, 1/180sec, f/9.5
Same as original.
Top Right ISO-100, 18mm, 1/180sec, f/9.5
Same as original.
Middle Left ISO-100, 72mm, 1/180sec, f/9.5
Same as original.
Bottom Left ISO-100, 28mm, 1/180sec, f/9.5
Same as original.
Bottom Right ISO-100, 59mm, 1/180sec, f/9.5
Same as original.
Amendment Summary
During the completion of my amendments I re-posted all of the pages because they work together as part of a Narrative picture essay.
Below is a list of the affected images and the improvements I made to each one:
- Cover Image – I increased the contrast
- Page 1 Top – Using Photoshop I cloned out the cacti
- Page 1 Bottom Right – I re-took this shot without flash
- Page 2 Top Left – I lightened the bag of flour using Photoshop
- Page 3 – I re-arranged the photographs on this page as they were originally in the wrong order
- Page 4 Top Right – I re-took this shot using a dark background
- Page 5 Bottom Left – I increased the contrast of this shot
- Page 5 Bottom Right – Using Photoshop I cloned out the mobile phone
Overall I feel I have followed my tutor’s advice quite well and have managed to improve the shots that needed amending.
![iwm_left_logo[1]](https://blogger.googleusercontent.com/img/b/R29vZ2xl/AVvXsEiy5_DUcR5kgHG16JugsG5cr3C0NgOC0dmEWLIJNtS9dX-b8XdqxfEPsPgwDnmX8ma7tesGp7m2xrax20xcDQ7M-gKRj7-6Pyu5Or0iaC5J2IIt4YqZ8_LVFUkxtPT5YEq4iAJLj2OY9tw/s1600-h/iwm_left_logo%5B1%5D%5B6%5D.gif "iwm_left_logo[1]")

![DM_317_20100115123110[1]](https://blogger.googleusercontent.com/img/b/R29vZ2xl/AVvXsEiiNcxaHlO79k9DtrS5Cs5VLLOvxHoRWrHwIcioBYV6dT2rXVnIPjhX749y159t8qlXVxMv7mYAqnprFxTppZ9IGDYogVuBkGFNx0BQVtcsMaxkFI63WgxEDNXpZlovz9Bbm3EkcG3xAwE/?imgmax=800 "DM_317_20100115123110[1]")